Sphero Edu IT Guide for SchoolsUpdated 2 months ago
Allowlist for Sphero Edu Apps and The Sphero Edu Platform
The Sphero Edu ecosystem provides a number of features that rely on web services, including class management, rostering, activity assignments, and cloud storage of program and activity progress. If your school or teachers are planning to use any of the online features with Sphero Edu, then you'll need to ensure certain URLs and services are allowed and unblocked. In many cases, key functionality will be blocked if the URLs below are not allowed on your network.
Sphero Edu App Client Allowlist
To ensure the apps can work properly, we recommend always allowing the following:
- https://sphero-sprk-mobile-app.s3.amazonaws.com
- https://sphero-media-sphero-prod.s3.amazonaws.com
- https://lb-community.s3.amazonaws.com
- https://cms-api-production.platform.sphero.com
- https://edu.sphero.com
- http://auth.littlebits.com
These URLs are important for accessing resources and services that the Sphero Edu apps need, including programs, activities, assets (like images and configuration files), account authentication, and the latest firmware images for your robots. These are key for core functionality, so we always recommend ensuring they are allowed.
Optional Allowlist URLs:
Our Sphero Edu app clients do use certain services to ensure optimal functionality and management of crashes/bugs. However, they are not essential for core functionality. We appreciate these being allowed when possible.
For crashes and reporting:
- https://firestore.googleapis.com
- https://api.amplitude.com
- https://warehouse.platform.sphero.com
For access to the JavaScript wiki:
- https://sites.google.com/sphero.com/sphero-edu-javascript-wiki
For access to Privacy Policy/Terms of Use:
- https://sphero.com
For access to support documentation:
- https://support.sphero.com
Sphero Edu Website (edu.sphero.com) Allowlist
Teachers will mostly visit the Sphero Edu website to create and manage classes, manage student accounts, and to work on finding activities to assign to their students. We recommend allowing the following if you are planning on using the Sphero Edu website, as they are required for various core services to function correctly:
- https://edu.sphero.com
- http://auth.littlebits.com
- http://api.littlebits.com
- http://classroom.littlebits.com
Optional Allowlist URLs:
For regional age check on creation of personal learner accounts (note: this flow isn't recommended for schools, as teachers should create accounts for their students):
- https://agegator.platform.sphero.com
For access to the JavaScript wiki:
- https://sites.google.com/sphero.com/sphero-edu-javascript-wiki
For access to Privacy Policy/Terms of Use:
- https://sphero.com
For access to support documentation:
- https://support.sphero.com
YouTube Video Allowlist
Many activities that students can work on have associated YouTube videos. These can play in the app or on the platform when using activities. We recognize that for most schools, YouTube is completely blocked, or only select channels/videos are allowed. While any YouTube video could be added to an activity, the official Sphero activities mostly use videos from these channels:
- https://www.youtube.com/channel/UCyoE0pVJCelsP0lnz-OsUQQ
- https://www.youtube.com/channel/UCM3c30DuxaH1qJjhpEVhrbA
- https://www.youtube.com/channel/UC5EJptL-l6f4tY6lRdLm_Sw
Whitelisting these channels should ensure most official video content can be accessed in our main activities.
Email Allowlist
If teachers are setting up accounts with an email and password, then they will get an email activation in their inbox. In some cases, these account activation emails will get blocked by spam filters or other email settings. Make sure that emails from [email protected] are allowed for your email services. We have more information here on unblocking emails for various email clients and services.
NOTE:
Our emails are sent from this IP address: 50.31.39.85
If your school only allows emails to arrive from specific IP addresses, then you will need to allow the above IP address. Otherwise you won't receive relevant emails for your accounts, including activation emails.
Other General Info
Ports 80 and 443 need to be open to allow web traffic, though this is rarely an issue since most schools have these ports unblocked.
iOS, iPadOS, and macOS Deployment
Apple School Manager is the primary way to deploy the iOS/iPadOS or macOS versions of Sphero Edu to a managed device pool in schools. This official management tool allows Schools to manage their device pool, disable certain functionality, and of most relevance to this document, deploy apps to the managed devices.
You can sign in at the official Apple School Manager portal here. You can then search for the Sphero Edu apps and deploy to the needed devices. There are two Sphero Edu listings (one for iOS/iPadOS, and one for macOS), so make sure to find and choose the correct one for your devices.
Apple's official support guide for Apple School Manager can be found here, and additional details about their education solutions can be found here. Do note that Apple School Manager can be utilized with other MDM (mobile device management) solutions, including many popular ones. If you use other MDM solutions for Apple hardware, please consult their support documentation and guides.
Chromebook Deployment
The Android version of the Sphero Edu app is now our officially supported version of the app on Chromebooks. If your Chromebooks are managed either with Google's enterprise or education admin solutions, then review Google's support documentation on how to Deploy Android apps to managed users on Chromebooks. Google also has additional guidelines and tips for deploying Android apps on Chromebooks in a school environment, located here. Below are some key steps and additional information that may be helpful.
To install the Sphero Edu app, your Chromebook will need to be set up with an account. Chromebook Guest Mode limits the ability to install or use most apps, including Google Play, Android apps, and most other software that isn't the browser. Without a student being signed into the Chromebook, there is also no way for an administrator to deploy the app since Android software is deployed at a "user" level rather than at a "device" level.
Setting up Managed Google Play (Optional)
Google recommends enabling an app setting called Managed Google Play to deploy the Android version of Sphero Edu. Don't worry - this won't result in your managed students having access to Google Play without restrictions. Rather, it will provide a portal for your students to access only the Android apps you have whitelisted in Google Play. In this case, this means they will only have access to Sphero Edu. While optional, allowing users to use Managed Google Play can be a better user experience in some situations, and reduce network traffic bottlenecks compared to forced installations. If you want to enable Managed Google Play, follow the steps below. Otherwise, skip to the Deploying The Android App on Chromebooks step.
- In Google Admin, go to Apps > Additional Services
- Select your organizational unit of choice, and enabled Managed Google Play

Deploying The Android App on Chromebooks
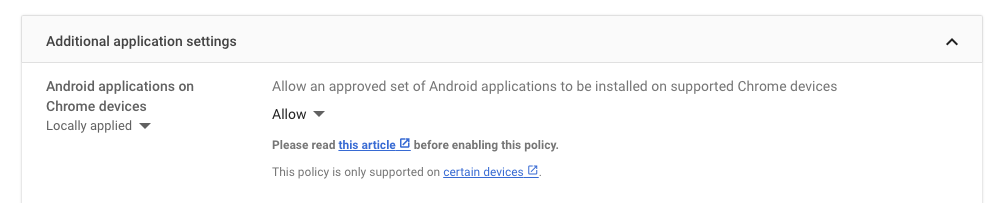
You will need to "allow" Android applications on Chrome Devices. Without allowing this setting, you won't be able to deploy Android apps to Chromebooks.
- Go to Devices > Chrome > Apps & Extensions > Users & Browsers
- In the top right corner of the page, select Additional Settings

- From the Additional Settings screen, go to Android applications on Chrome devices under Additional application settings and select "allow".
- Now that Android apps are supported, go back to Devices > Chrome > Apps & Extensions > Users & Browsers
- In the bottom right corner, select the + icon, and select the Google Playicon (second from bottom)

- Search for Sphero Edu, and from the app overview page, tap "Select".
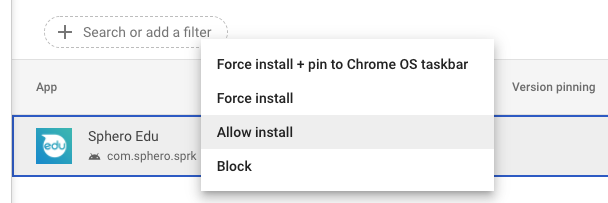
- When deploying the Sphero Edu Android app, you will have two core options (installation policies). You can allow students to manually install from Managed Google Play, or you can force install the app to their Chromebook. With the latter option, you can also pin the app to the task bar after installation.
Managed Configurations
As of release 6.5.0, the Sphero Edu Android app supports managed configurations. As part of your deployment strategy, you can enable or disable specific app features, including sign up options, sign in options, and certain app settings. Managed configurations are set in the same UI panel as the installation policy options. Since managed configurations require setting JSON keys and values, we recommend reviewing the details in our Managed Configuration Guide before attempting to modify.
Location Services Requirements
As of version 6.7.1 on Android 12 and up, the Sphero Edu Android app does not allow scanning of Bluetooth beacons, nor does it require any Location Permissions or Location Services. Only Bluetooth needs to be supported and enabled, so any setting that negatively affects Bluetooth will affect connection.
As of version 6.3.3, the Sphero Edu Android app does not require any Location Permissions to be granted since it uses a Companion Device pairing process. This means that the Android operating system handles scanning for bluetooth hardware and ensures that the Sphero Edu app does NOT need to declare coarse or fine location permissions. As a result, the user grants no capacity to Sphero Edu to capture hardware location data.
However, on Android operating systems below Android 12 (8-11), Location Services are required at an OS level to use BLE (Bluetooth Low Energy) for the scanning process. This is an OS level requirement for your device to scan BLE devices, and it means that Location Services must be set to "on" for Chromebooks devices if you wish to scan for Sphero robots. Below are the required steps to enable Location Services, starting with the settings in Google Admin:
Geolocation:
As a reminder, the steps immediately below are done in Google Admin for your organizational unit.
To ensure that robots can connect in the Android app, you will need to ensure that location services are not blocked by Geolocation settings:
- From Google Admin, go to Devices > Chrome > Settings > Users & Browsers
- Under User & Browser Settings, Scroll down to the Security section (or search for it)
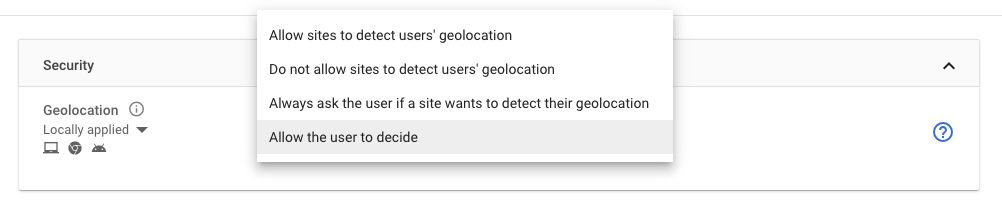
- From there, find the “Geolocation” setting. Change it from “Do not allow sites to detect users’ geolocation” to “Allow sites to detect users’ geolocation” or “Allow the user to decide”.
Google Location Services:
As a reminder, the steps immediately below are done in Google Admin for your organizational unit.
You may also need to enable additional location service settings. You can do so by following the steps below:
- From Google Admin, go to Devices > Chrome > Settings > Users & Browsers
- Under User & Browser Settings, scroll to the Android Applications section (or search for it)
- Look for a setting called Google Location Services and ensure it’s enabled

Chromebook Location Services:
Now that Google Location Services are enabled, users can turn them on for each Chromebook:
The steps below are done on the actual Chromebooks themselves, not on Google Admin.
- On the Chromebook, go to Settings > Apps
- From the apps menu, select Google Play Store
- From the Google Play Store menu, select Manage Android preferences
- From Android preferences, select Security & Location
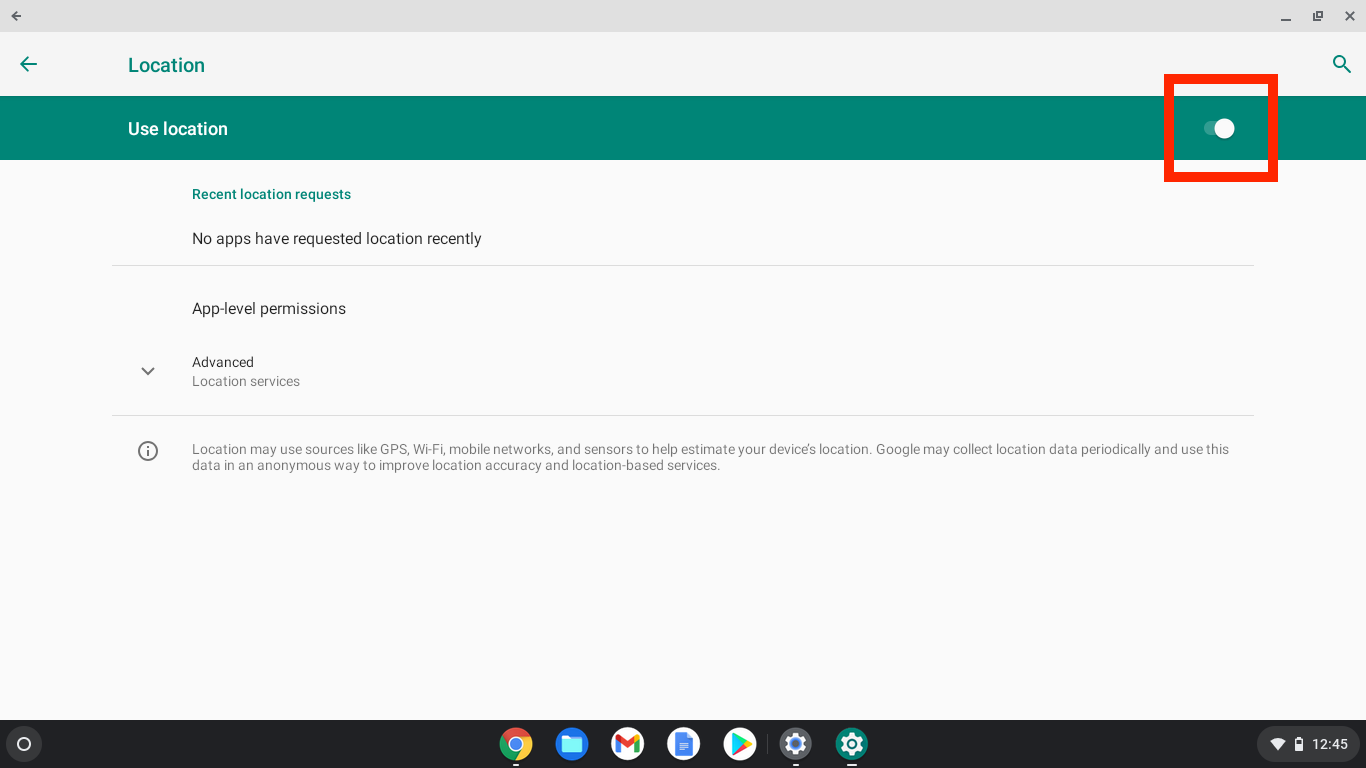
- Under the Privacy header, select Location
- On the Location screen, toggle Use Location to On
If you use iboss for your managed Chromebooks, you may need to take additional steps to unblock required URLs for the Android version of the Sphero Edu app. This iboss plugin may be needed to ensure URLs for the Sphero Edu app are not blocked when running the app.
Windows Deployment
If your students or teachers have access, then the most straightforward and official way to download the Sphero Edu app is through the Microsoft Store.
When you click on the above URL, you will be redirected to the app listing in your default language/region. Per your account settings, you can optionally have updates automatically applied. This will ensure your Sphero Edu app is always up to date with any new feature releases or patches.
The .msixbundle does require some dependencies, which it will procure from the Microsoft Store if you are online. If need be, we also provide a zipped folder of the dependencies on our official download page, which must be installed before the .msixbundle is installed.
Lastly, we also provide an .exe for installation, which includes the app dependencies. This may be applicable for some scenarios, and it is also accessible from our official download page.
Sphero Edu Deployment with Intune (Microsoft Endpoint Manager)
The most straightforward way to deploy Sphero Edu to a Windows device pool is with a Mobile Device Management solution (MDM). If you are an IT administrator for a school or district, we recommend using Intune (Microsoft Endpoint Manager), which is Microsoft's official solution for deploying apps and managing devices.
If you use Intune (Microsoft Endpoint Manager), there are two primary ways to deploy Sphero Edu; through the Microsoft Store, or with our .msixbundle and associated dependencies as a Line of Business (LOB) deployment.
Deploy Sphero Edu via Microsoft Store with Intune:
- From the Apps tab, select Windows (under By Platform), then choose to Add

- From the Add panel, choose Microsoft Store App
- Fill out the applicable details in App Information (step 1). To get you moving in the right direction, you can fill out the fields as follows:
Name: Sphero Edu
Description: The Sphero Edu app is used to program Sphero robots.
Publisher: Sphero, Inc.
Appstore URL:https://www.microsoft.com/en-us/p/Sphero-Edu/9N2796R62XLZ
Category: (your preference)
Show this as a featured app in the Company Portal: (your preference)
Information URL: https://edu.sphero.com/about
Privacy URL: https://sphero.com/pages/privacy
Developer: Sphero, Inc
Owner: (your preference)
Notes: (your preference)
Logo:SpheroEdu-AppLogo.png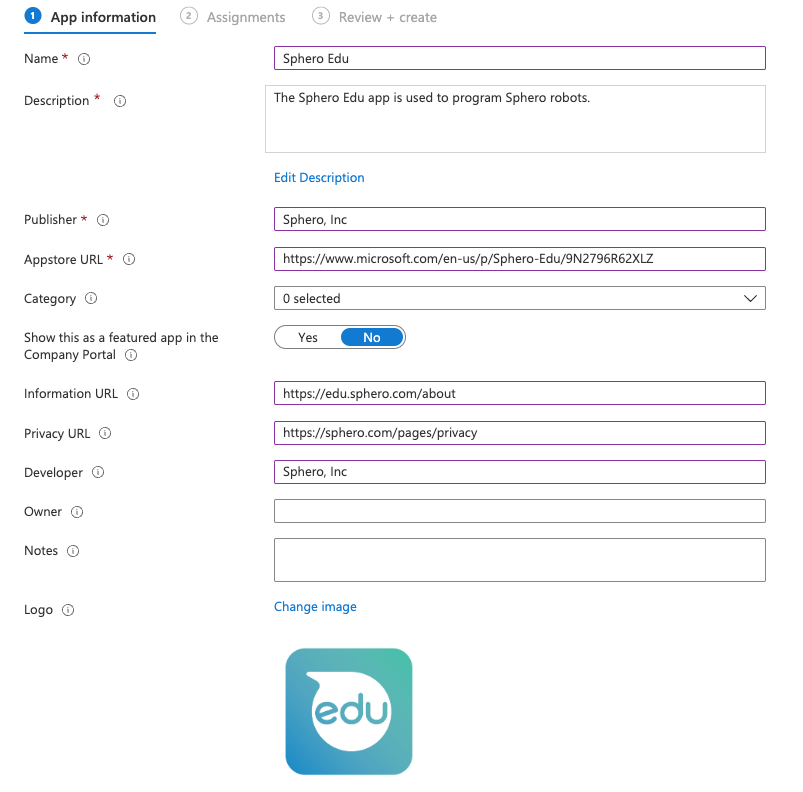
- Add your preferred users/groups that will have access to the app on the Assignments screen (step 2)
- Review all the information on the Review + Create (step 3) page, then click Create
Deploy Sphero Edu via Line of Business (LOB) .msixbundle with Intune:
- From the Apps tab, select Windows (under By Platform), then choose to Add
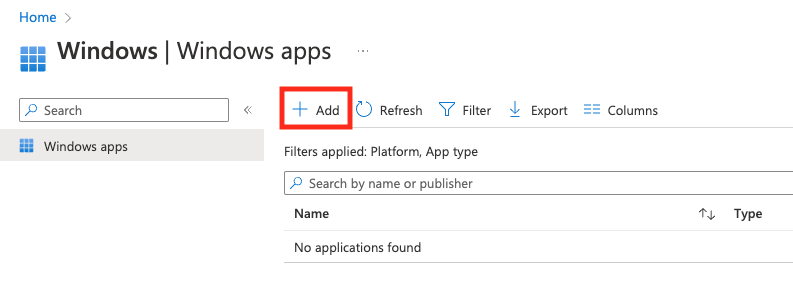
- From the Add panel, choose Line-of-business App
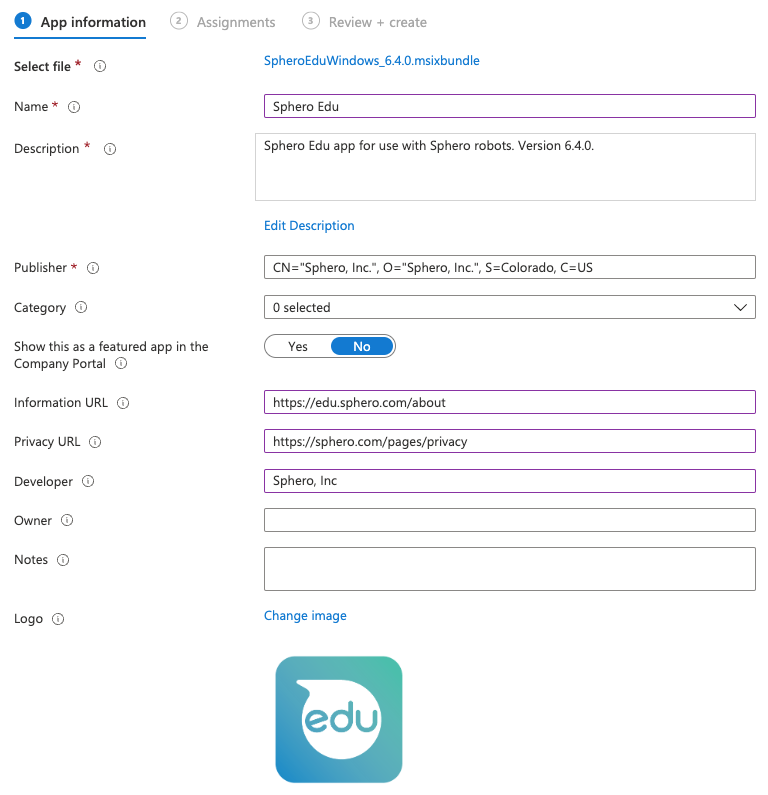
- On the App Information (step 1) screen, choose Select app package file
- Upload the latest Sphero Edu .msixbundle that you've downloaded from our official download page
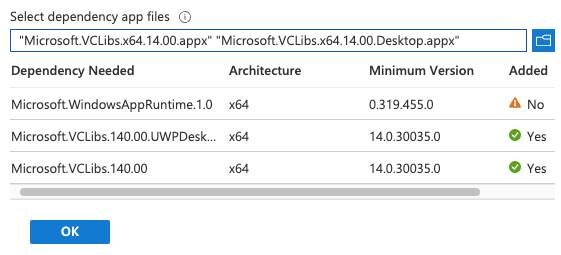
- Once you add the .msixbundle, you may notice that Microsoft Endpoint Manager warns you about app dependancies:
The following dependencies were detected in the app package file. If these files are not added, the app might not install on the specified device types.
The Sphero Edu app uses the Windows App SDK, which means that you must have the needed runtimes to effectively run Sphero Edu. This includes the following:
• Microsoft.WindowsAppRuntime.1.0.msix (or a higher version)
• Microsoft.VCLibs.x64.14.00.Desktop.appx (or a higher version)
• Microsoft.VCLibs.x64.14.00.appx (or a higher version)
Your devices may already have these dependencies. If you've confirmed that's the case, you can skip to step 7 and deploy the msixbundle without deploying these dependencies. Furthermore, if your computers have access to the Microsoft Store, then the msixbundle installation process will download these dependencies as needed. If the Microsoft Store is blocked, then you will need to manually deploy these dependencies, as documented in step 6. - If you need to manually deploy the .msixbundle dependencies, download the latest dependencies from our official download page and then upload the .appx files:
Once the Windows App Runtime has been installed, then you should be able to go back to step 2 and add the Sphero Edu .msixbundle and associated .appx dependencies.
NOTE: The deployment of the Windows App Runtime may fail if a device already has a newer version of the runtime installed.
- Fill out the applicable details in App Information (step 1). To get you moving in the right direction, you can fill out the fields as follows:
Name: Sphero Edu
Description: The Sphero Edu app is used to program Sphero robots.
Category: (your preference)
Show this as a featured app in the Company Portal: (your preference)
Information URL: https://edu.sphero.com/about
Privacy URL: https://sphero.com/pages/privacy
Developer: Sphero, Inc
Owner: (your preference)
Notes: (your preference)
Logo:SpheroEdu-AppLogo.png
- Add your preferred users/groups that will have access to the app on the Assignments screen (step 2)
- Review all the information on the Review + Create (step 3) page, then click Create
Additional Dependencies for the Windows Sphero Edu App
Sphero Edu uses a web view to render and display the programming canvases. For Windows, this is Microsoft Edge WebView2. In most cases WebView2 will stay up to date if Microsoft Edge is installed on your computer and updated. Furthermore, the Sphero Edu app itself will install the web view if you have access to the internet.
However, there are instances where you or your students may not have WebView2 on their computers, may not have the Edge browser, or network traffic may be blocked. In these cases, Microsoft provides various stand alone installer options for WebView2 on their WebView2 runtime download page.
Installation with PowerShell
If you'd like to install the Sphero Edu app with PowerShell, you can do so, both with the .exe and .msixbundle.
Deploy the .exe on your device:
Use the following, where downloads is the directory for your file, and the SpheroEduWindowsInstaller_6.4.0.exe is the name of your downloaded Sphero Edu .exe:
Start-Process -Wait -FilePath "C:\downloads\SpheroEduWindowsInstaller_6.4.0.exe" "/S" -PassThru
Deploy the .msixbundle and dependencies on your device:
If you want to install the Sphero Edu .msixbundle and all dependencies via PowerShell, first download the msixbundle and dependencies from our official download page, then use the following, where downloads is the directory for your files, SpheroEduWindows_6.4.0.msixbundle is the name of the Sphero Edu .msixbundle file, and Microsoft.WindowsAppRuntime.1.0.msix, Microsoft.VCLibs.x64.14.00.Desktop.appx, and Microsoft.VCLibs.x64.14.00.appx are the names of the dependency files.
Add-AppxProvisionedPackage -Online -PackagePath "c:\downloads\SpheroEduWindows_6.4.0.msixbundle" -SkipLicense -DependencyPackagePath
"c:\downloads\Microsoft.WindowsAppRuntime.1.0.msix",
"c:\downloads\Microsoft.VCLibs.x64.14.00.Desktop.appx",
"c:\downloads\Microsoft.VCLibs.x64.14.00.appx"
Users will know it is completed when they receive messaging similar to:
Path:
Online: TrueRestartNeeded: False
For additional information on Windows deployment solutions with the available Sphero Edu .msixbundle, please review this Microsoft document: MSIX App Distribution.